Security, convenience, accessibility—these are what makes the iCloud one of the best gifts of technology to us. It safely stores all our content in Apple’s secure cloud infrastructure. It affords us the convenience of syncing all our data and devices in a single cloud storage that is accessible from all Apple devices, as long as you have an internet connection.
If you don’t have one yet, now is the best time to create an iCloud account. Maybe start looking for the best place to sell your laptop secondhand and get yourself an Apple device.
Once you do, or if you already had one but aren’t using iCloud yet, follow these steps to setup, access, and customize iCloud.
iCloud on Mac
Before you set up your iCloud, make sure that your device is updated with the latest version of the macOS. To set up iCloud, simply go to the Apple menu and click on System Preferences. Click on Apple ID and key in your own ID and password. You’ll then be signed in and iCloud will automatically be turned on.
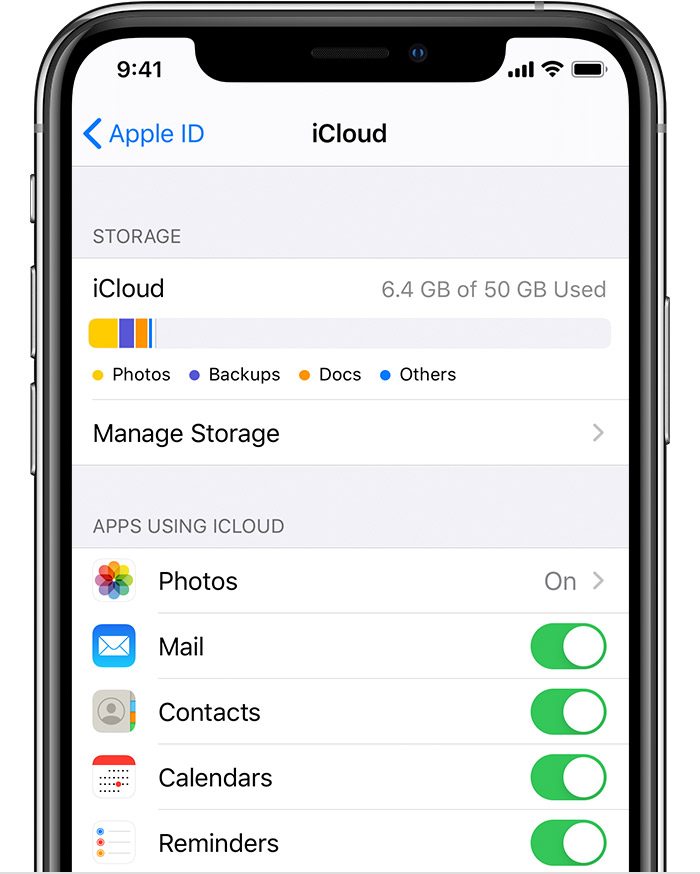
iCloud can be accessed by clicking on System Preferences first, and then on iCloud. A list of available apps and services will be displayed. The list includes Contacts, Calendar, iCloud Drive, Keynote, Reminders, Photos, and third-party apps. Go through the list and tick the apps and services you want to store.
You may want to upgrade your storage if you plan on storing more than 5GB—which you most likely will. To upgrade storage, go to System Preferences and select iCloud. Click on Manage, then click either Buy More Storage or Change Storage Plan. You can the follow the instructions to push through with the change in subscription.
iCloud on iPhone and iPad
For your mobile devices, make sure that you have the latest iOS and iPadOS versions. iCloud is automatically switched on whenever you log in to your device using your Apple ID.
To access iCloud, go to Settings and tap your ID. A list of apps and services that can be used in the iCloud will appear. This list is pretty much the same as what you’d see on Mac. To the left of each app and service is a slider. Just tap on the ones beside each of the services you want to use. Take note that you may have to enable permissions for some apps.
The free 5GB storage space is for all your devices connected to your Apple ID. If you have multiple devices and love taking several pictures and videos, 5GB would definitely not be enough to store all your content.
To upgrade your storage plan, go to Settings and tap on your Apple ID to sign in. Tap on iCloud, then on Manage Storage. Similar to what you would do on your Mac, choose Upgrade iCloud Storage and follow the subscription instructions after.